The Landing Page Generator is an AI-powered landing page builder for complete, ready-to-publish pages. You describe goal, offer, target audience, desired language, call to action, and visual direction. From this, the AI creates a structured landing page that you can then further customize in the visual editor, equip with your own images, prepare for search engines and social sharing, and publish directly.
In this article
- What the Landing Page Generator is for
- The typical workflow
- Briefing: the foundation for a good result
- Goal, language, and call to action
- Landing page brief
- Design and brand references
- Images for the finished page
- Briefing review: follow-up questions before generation
- AI draft and page structure
- The editor: preview, sections, and inspector
- Preview and device views
- Managing sections
- Inspector: editing fields directly
- AI Section Edit
- Advanced HTML editor
- Files, images, Unsplash, and image generator
- Reference files
- Page Images
- Unsplash browser
- Creating your own visuals with the image generator
- Lead forms and webhooks
- SEO, social preview, and technical settings
- SEO
- Social preview
- Scripts and trusted HTML snippets
- Versions, preview, and readiness
- Version history
- Preview
- Readiness check
- Publishing, hosting, and domains
- Hosting and CDN delivery
- Public URL and slug
- Custom domains
- Unpublish and delete
- Status, moderation, and public visibility
- Team, access, and collaboration
- Recommended way of working
- Important notes and limitations
The tool is designed for situations where a professional page needs to be created quickly from an idea: campaign landing pages, Google Ads destination pages, offer pages, product launches, webinar or event pages, lead generation pages, local service pages, or quick test pages for new positioning. Instead of assembling copy, structure, design, assets, form, hosting, and domain publishing in separate tools, the Landing Page Generator guides you through the entire process.
The tool is particularly powerful because it doesn’t stop at an AI text draft. The page is created as an editable draft, can be modified in sections, and can then be published via a fast hosting and CDN system. If desired, your own domains can be connected so that a real campaign page with professional delivery emerges from an AI draft.

What the Landing Page Generator is for
A good landing page needs more than a nice headline. It must bring together target audience, value proposition, objections, trust, visual guidance, call to action, and technical publishing. This is exactly what the Landing Page Generator is built for.
The tool helps you especially when you:
- need a complete landing page quickly for an offer or a campaign.
- want to test an idea without immediately starting a full website project.
- want to explain an existing service better and align it more strongly towards conversion.
- want to derive a first professional structure from a short briefing.
- want to edit a page visually without having to write code yourself.
- need a focused destination page for ads, newsletters, social campaigns, or direct outreach.
- want to handle hosting, preview, publishing, and optional custom domain in the same workflow.
The Landing Page Generator does not replace your professional review. But it takes the heavy lift off your shoulders: structure, first content, visual direction, and the technical page basis are created automatically and can then be refined in a targeted way.
The typical workflow
The workflow is deliberately divided into several steps. This way, you don’t have to phrase everything perfectly in a single big prompt, but can build and control the page step by step.
| Step | What happens | Why this matters |
|---|---|---|
| Capture briefing | You describe goal, language, CTA, offer, target audience, style, and optionally existing files. | The clearer the briefing, the more precisely the AI can prepare structure, tone, and content. |
| Briefing review | The AI shows a planned page structure and asks follow-up questions if needed. | Unclear points can be clarified before generation instead of being laboriously fixed later. |
| Create AI draft | A first landing page draft is created from the confirmed briefing. | You don’t start with a blank page, but with a complete, editable foundation. |
| Edit visually | You edit copy, images, sections, forms, SEO data, and design details in the editor. | The AI provides the starting point, but you keep control over the final presentation. |
| Check readiness | The tool checks whether key publishing requirements are met. | Missing mandatory information, problematic forms, or open notes become visible before publishing. |
| Publish | The page is made available as a published version and can be reached via public URLs or domains. | The draft becomes a real landing page for campaigns, links, and visitors. |
This separation is especially helpful for beginners: you don’t need to know all editor functions right away. Start with a solid briefing, let the AI prepare a page, and then work through it section by section.
Briefing: the foundation for a good result
The “Create a new page” area is the starting point for new landing pages. Here you tell the AI what the page should achieve and which content or visual guidelines are relevant.
Goal, language, and call to action
The process begins with three particularly important details:
- Goal / use case: Describe what the landing page is being created for, for example lead generation, product presentation, event registration, or an offer page.
- Content language: Define the language in which the page should be written. This setting also affects later AI functions such as text refinements.
- Primary CTA: Define the most important action visitors should take, such as “Request consultation”, “Book demo”, “Get quote”, or “Register for webinar”.
The more concrete these details, the more clearly the AI can align the page with a goal. A landing page for an immediate contact request needs a different dramaturgy than an explanatory product page or an event registration page.
Landing page brief
The large briefing field is the most important content area. Here you can describe offer, target audience, value proposition, specifics, objections, desired tone of voice, proof points, FAQ ideas, and other requirements.
A good briefing, for example, answers:
- Who is the page for?
- Which concrete problem or need does the page address?
- What is the most important outcome visitors can expect?
- Which benefits, proof, references, or trust elements should be mentioned?
- Which typical objections should be addressed?
- Which terms, phrases, or statements should be avoided?
- Which visual direction suits the brand or campaign?
You can start with a short briefing. For high-quality results, however, it’s worth providing extensive context. The tool additionally offers sample templates for typical scenarios such as lead generation, product launch, or event registration.
Design and brand references
Under “Design and brand references” you upload files that help the AI better understand style, brand, or visual direction. These can be logos, style guides, layout examples, PDFs, screenshots, or other references.
The distinction is important: reference files are context for the AI. They are not automatically images that appear on the published landing page. This allows you to provide the AI with style materials without using that file as a public page image later.
Images for the finished page
Under “Images to use on the page” you upload images that may actually be used on the landing page. These include logos, product images, team photos, hero images, background images, or other visual assets for the page.
These images are stored as Page Images and can later be selected in the editor for image fields. They are optimized server-side for web usage so the published page is delivered faster and cleaner.
If you don’t upload your own images, the AI can still prepare a page with graphic areas, icons, patterns, and placeholder areas. For a truly on-brand landing page, however, your own or deliberately selected images are usually significantly more effective.

Briefing review: follow-up questions before generation
Before the complete landing page is generated, the Landing Page Generator checks the briefing in a review step. This step is important because the AI does not immediately build a page, but first plans it and reveals possible gaps.
In the briefing review you see:
- Planned page structure: an outlined page structure with the planned sections.
- Optional questions: follow-up questions that can improve the result but do not need to be answered.
- General briefing details: an area for additional notes that come to mind during the review.
The follow-up questions are deliberately optional. If you answer a question, this information is included in the final generation. If you can’t or don’t want to answer everything, you can still continue. The advantage is that unclear points don’t surprise you in the finished draft but become visible beforehand.
If the AI has no meaningful follow-up questions, the review is still displayed in a useful way. You can then generate directly or add general notes. This keeps the workflow lean even with very clear briefings.

AI draft and page structure
After the review, the tool generates a complete landing page draft. This draft consists not only of text, but of structured sections, editable fields, possible image slots, form areas, and page settings.
Typical sections can include, for example:
- Hero area with headline, subheadline, call to action, and visual entry.
- Benefit or service areas with clear arguments.
- Problem-solution sections that address the target audience’s needs.
- Trust signals such as testimonials, logos, key figures, or case studies.
- FAQ sections for objections and frequently asked questions.
- Lead forms or contact areas.
- Final call-to-action sections.
The AI decides which structure makes sense based on your briefing. You can then move, duplicate, remove, add, or specifically rewrite sections. The draft is therefore not a rigid result, but an editable working basis.
The editor: preview, sections, and inspector
The editor is the central workspace for existing landing pages. On the left or in the middle you see the page preview. On the right you work with the inspector, files, settings, history, and readiness. The top toolbar lets you switch between important work areas.
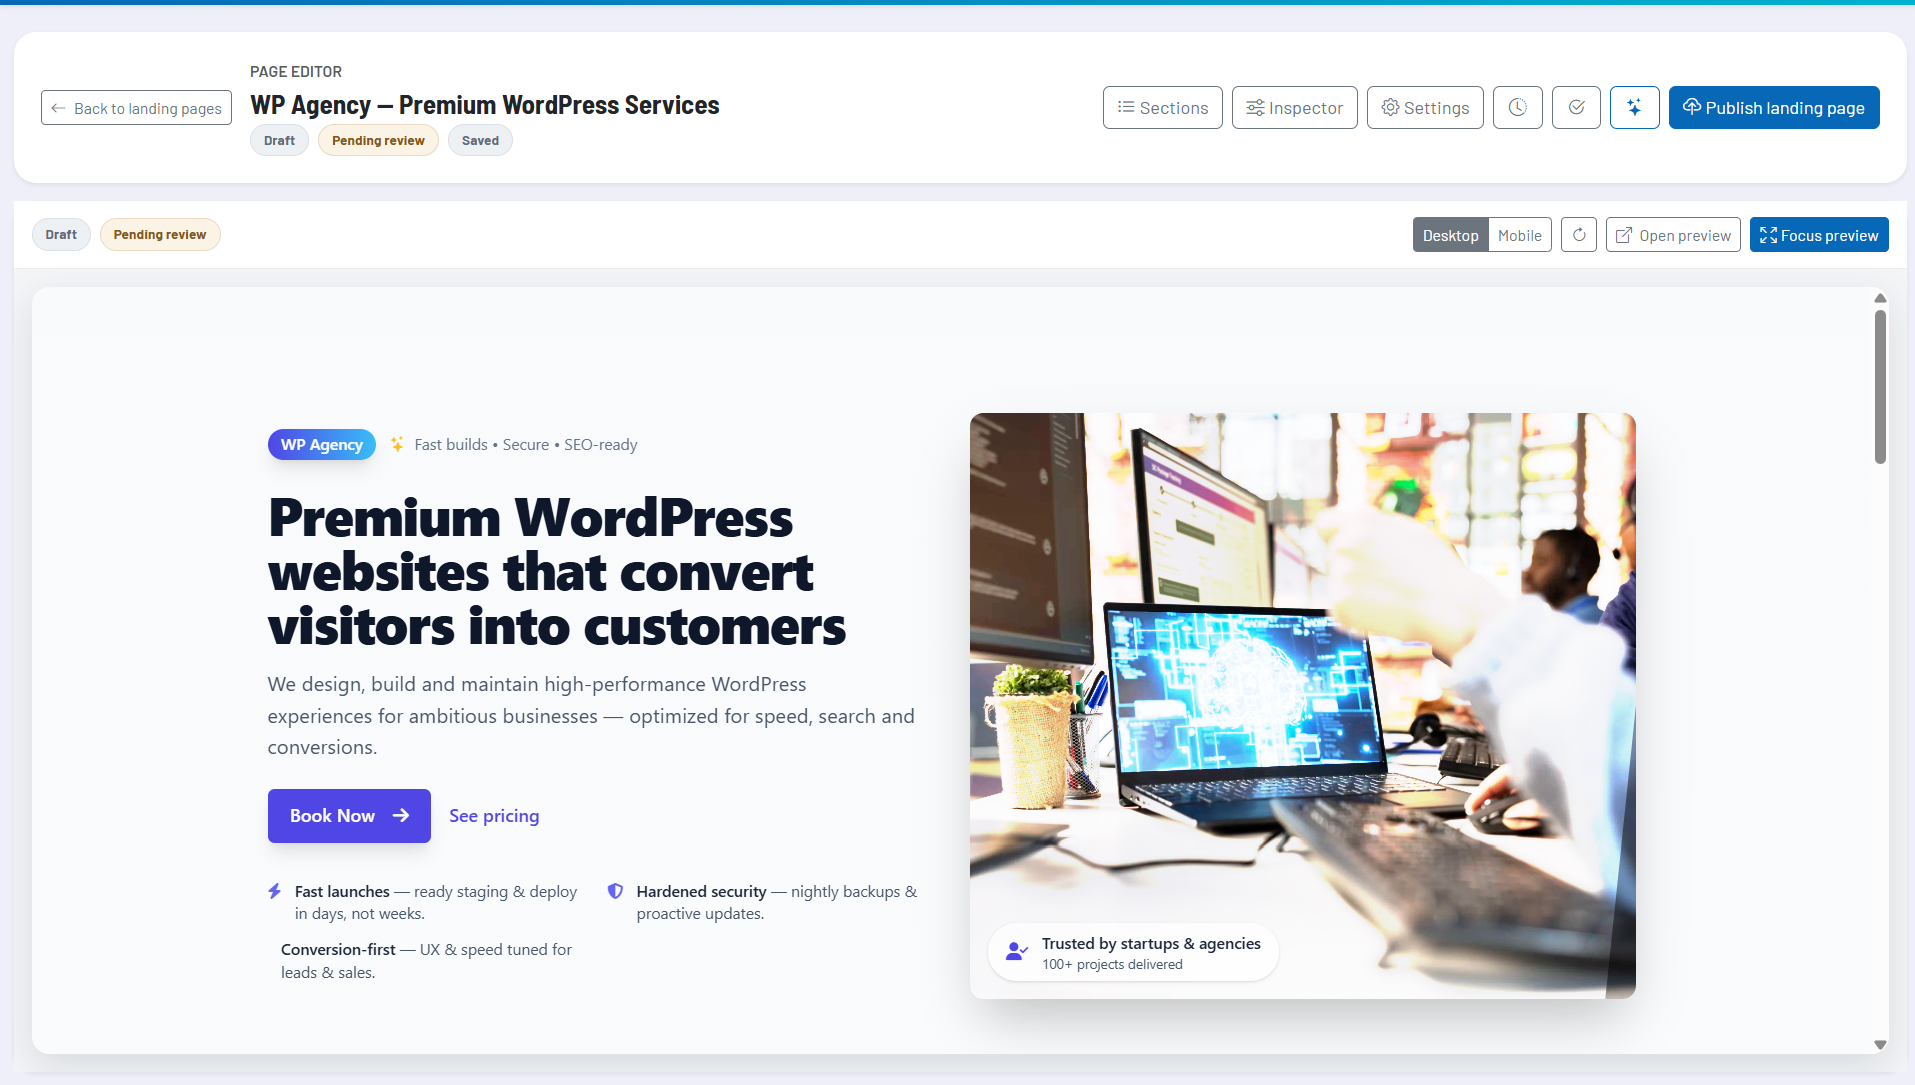
Preview and device views
The preview shows the current draft in an embedded editor area. You can switch between desktop and mobile view, refresh the preview, and open a separate preview. This is especially helpful when checking layout, line breaks, image impact, and call-to-action placement.
Always check a landing page in both views. Hero areas, long headlines, form blocks, and image areas often look different on smartphones than on desktop.
Managing sections
The “Sections” view opens the page’s section list. There you can select individual areas and edit the page structure.
- Select: a section is focused in the preview and becomes editable in the inspector.
- Move: sections can be moved up or down.
- Duplicate: an existing section can be used as the starting point for a variant.
- Insert: new sections can be added before or after the current section.
- Add lead form: a controlled form block can be inserted into the page.
- Delete: unneeded areas can be removed.
This section logic makes the editor much easier than a free-form code surface. You work with clear building blocks and can gradually improve the page’s dramaturgy.
Inspector: editing fields directly
The inspector shows the editable fields of the selected section. Text fields can be edited directly. Image fields offer a selection from the landing page’s Page Images. Depending on the section, link and button fields can also be edited.
Text fields additionally provide an AI refinement option. This allows you to sharpen, shorten, lengthen, or simplify individual pieces of content, or adapt them to the page language without regenerating the entire page.
AI Section Edit
If an entire section needs to be changed, you can trigger a targeted AI change for that section. Describe specifically what should change, for example “shorter and more focused on consultation”, “build more trust with concrete benefits”, or “make the CTA more prominent”.
The tool shows a preview of the suggested change before it is applied to the draft. This lets you use AI changes in a controlled way without immediately overwriting the saved state.
Advanced HTML editor
For advanced users, there is an extended HTML editor for individual sections. This area is meant for targeted technical tweaks when the normal fields are not sufficient. Beginners should preferably work with the structured inspector fields because they are safer and more transparent.
Files, images, Unsplash, and image generator
The files area is one of the most important parts of the editor because the quality of a landing page strongly depends on visual assets. The tool consistently differentiates between reference files and Page Images.
Reference files
Reference files help the AI understand style, brand, product, tone, or desired design. You can upload, for example, brand guides, sample pages, PDFs, screenshots, or layout references.
Reference files are not intended to appear automatically and publicly on the landing page. They serve as context in the work process. This is especially important when you want to show the AI style examples or comparison material that should not be part of the published page.
Page Images
Page Images are images that may be used on the landing page. They appear in the inspector for image fields and can be assigned to specific areas there. These include, for example, hero images, background images, product images, team photos, or social preview images.
User-uploaded Page Images are optimized for web delivery. This keeps pages fast, and very large original files are not served unchanged as web assets. If an image field does not yet have a real image, the preview does not show a broken image state but a clean placeholder until you select a suitable asset.
Unsplash browser
In the editor, you can use the integrated Unsplash browser to search for stock photos and import suitable images directly into the landing page. Imported Unsplash images are not embedded as external hotlinks but are downloaded server-side, optimized, and saved as Page Images in the landing page.
After import, the image is available in the asset area. To use it, select a section with an image field, open the inspector, and set the image there as a Page Image. This separation ensures that you consciously decide which image is used where on the page.
Creating your own visuals with the image generator
Directly above the Unsplash integration, the tool links to the Cockpit Image Generator. This is useful if you don’t want a typical stock photo style, but instead want to create a custom visual for your campaign or further develop existing image material.
The practical workflow is: create or edit a visual in the image generator, download the result, and then use it as a Page Image in the landing page. This way, you can use not only classic stock photos, but also your own campaign-specific visuals.

Lead forms and webhooks
The Landing Page Generator can insert lead form blocks into the page. These forms are intended for contact requests, demo requests, callback requests, event registrations, or similar conversion goals.
A form block consists of:
- visible form layout and form copy.
- configurable fields such as name, email, phone, or message.
- required-field settings.
- success and error messages.
- design options for card, accent color, layout, and field rounding.
- an HTTPS webhook for delivering the request.
Important: Cockpit does not store incoming lead data as its own CRM module within the landing page. The form sends the request to the HTTPS webhook you configure. This webhook can, for example, trigger your CRM, an automation tool, your own backend, or an internal lead routing process.
Webhook requests are additionally signed with a secret. Recipients can verify this signature to ensure that the request originates from Cockpit. Existing recipients can ignore the signature if they are not yet prepared for it. For production forms, however, a clean server-side verification is recommended.
Before publishing, you should test every form: are fields, required fields, messages, webhook destination, and processing in the target system correct? A beautifully designed landing page is of little use if the actual request does not reliably arrive.

SEO, social preview, and technical settings
In the “Settings” area you configure the most important page settings for publishing, discoverability, and preview. These settings are particularly important if the landing page is to be shared publicly, advertised, or indexed.
SEO
SEO settings include page title, meta description, canonical URL, robots setting, and favicon. These details influence how the page is technically described and appears in search engine contexts.
For campaign landing pages, the meta description is not always the most important ranking factor, but it is still valuable: it creates clarity when the page is shared, reviewed, or later used in larger site structures.
Social preview
The social preview settings control Open Graph title, description, and image. This data is used when the page is shared in many social networks, messengers, or preview systems.
A good social image should match the campaign, feel calm enough, and remain recognizable even in small previews. You can select a Page Image for this or enter an external image URL if you deliberately want to use it.
Scripts and trusted HTML snippets
In the scripts area you can store trusted HTML snippets, for example for verification, tag manager, analytics, consent tools, or no-script fallbacks. The tool differentiates between positions such as head, body start, body end, and no-script fallback.
This feature is powerful and should be used with care. Only insert code you fully trust and for which data protection and tracking implications are clarified. Script snippets do not run in the editor preview; they are meant for the published page.
Versions, preview, and readiness
Version history
Version history helps you track earlier states of a landing page. You can view versions and restore them if needed. Restoring creates a new draft state. The published page is not automatically changed unless you publish again.
This is particularly helpful when major AI changes have been tested, or when you want to return to a clearer earlier variant after several editing steps.
Preview
The preview functions let you review the current draft without publishing it immediately. This is useful for internal alignment, final corrections, and mobile quality control. Pay particular attention to headline lengths, button texts, image crops, form functionality, and how the page appears in smartphone layout.
Readiness check
The readiness area checks whether the page is basically prepared for publishing. It displays blocking items, warnings, and passed checks. Blocking items must be resolved before the page can be published. Warnings do not necessarily block publishing but should be reviewed deliberately.
Typical hints cover missing mandatory information, unconfigured forms, problematic or missing images, open SEO data, domain or publishing status, and technical settings.

Publishing, hosting, and domains
When a landing page is ready, it can be published. During publishing, a public version of the page is created and delivered via the landing page hosting. The publishing process separates draft and live version: changes in the editor only become visible publicly once you publish again.
Hosting and CDN delivery
Published landing pages are prepared for fast delivery. The relevant page assets are exported for the public version and delivered via a global CDN system. This makes the tool suitable not only for internal drafts, but also for real campaigns with public visitors.
It’s important that only actually publishing-relevant Page Images are exported as public assets. Reference files that serve only as AI or design context are not intended as public page images. This keeps private style or design references separate from the actual publishing.
Public URL and slug
Each landing page can have a public URL slug. The slug should be short, readable, and campaign-related. Use descriptive terms that will still make sense later in ads, emails, or reports.
Custom domains
In the “Publishing and domains” area you can manage domains. The tool supports page-specific domains and general landing page domains. A page-specific domain takes precedence for that exact landing page, while a general domain can serve as an overarching base for landing page URLs.
Custom domains require DNS settings. Typically, a CNAME target is shown that must be configured at your domain provider. After that, the domain can be verified. Only when domain, routing, and SSL status are correct should the domain be used in production campaigns.
Unpublish and delete
If a landing page should no longer be publicly accessible, you can unpublish or delete it. Unpublishing removes public delivery while keeping the draft. Deleting removes the landing page from your overview and cleans up associated landing page resources.
For campaigns, the recommendation is: use unpublish if you might need the page again later. Use delete if the page is truly no longer needed.

Status, moderation, and public visibility
Landing pages can have different statuses. A draft is not yet publicly live. A published page is accessible via its public URL. Additionally, review or moderation statuses can be visible when a page must be reviewed before or after publishing.
The status indicators help you distinguish between work state, public publishing, and review. Pay particular attention to notices such as “Review pending”, “Review required”, or “Approved” when they appear in your workflow. They do not indicate the creative editing state but an additional approval or review status.
Team, access, and collaboration
The Landing Page Generator is tied to the tool access of your Cockpit account. Team members with appropriate access can also use the tool and create their own landing pages. In the current workflow, landing pages are user-based, meaning they are not automatically combined into a shared project library for all team members.
For collaboration, a clear alignment process is recommended:
- One responsible person creates and maintains the landing page in the tool.
- Preview or published links are shared for feedback.
- Content changes are collected and then implemented in a targeted way in the editor.
- Technical settings such as webhooks, domains, tracking, and scripts are reviewed by people responsible for these areas.
This keeps it clear who is editing the active version, and alignment takes place in a controlled way via previews, comments, or external project communication.
Recommended way of working
This sequence helps you work reliably and avoid common mistakes:
- Define the goal clearly: Don’t start with design wishes but with the purpose of the page and the desired visitor action.
- Describe the target audience concretely: The more precise the target audience, the better the AI can match tone, arguments, and objections.
- Set the primary CTA: A landing page should have one clear main action. Additional actions should not dilute it.
- Cleanly separate references and Page Images: Upload style material as references and real page images as Page Images.
- Take the briefing review seriously: Answer follow-up questions when they concern important information. You can skip minor uncertainties.
- After generation, first check the structure: Make sure order, dramaturgy, and key message are right before perfecting individual sentences.
- Edit section by section: Work through the editor from top to bottom and use the inspector instead of jumping straight into the advanced HTML editor.
- Place images deliberately: Select Page Images intentionally in each image field and check the crop in both desktop and mobile views.
- Use AI edits in a controlled way: Use AI Section Edit for specific section changes and only accept suggestions after reviewing them.
- Test forms: Check fields, required data, webhook target, success message, and actual delivery.
- Add SEO and social preview: Fill in title, description, and preview image before sharing or advertising the page.
- Run the readiness check before publishing: Resolve blocking items and make conscious decisions about warnings.
- Test live after publishing: Open the public URL, test mobile view, form, tracking, domain, and social preview.
Important notes and limitations
The Landing Page Generator is a tool for fast, professional landing page creation. Nonetheless, certain checks remain your responsibility. Review professional statements, legal notices, data protection, tracking, cookie or consent requirements, brand rights, image rights, webhook processing, and domain configuration before publishing.
AI can deliver very good structures, wording, and visual ideas, but it does not automatically know all internal approvals, legal specifics, or industry constraints of your company. Treat the draft as a strong starting point, not as unreviewed final truth.
For best results, combine a clear briefing, suitable images, targeted manual review, and the readiness check. This way, the AI draft becomes a landing page that not only looks good, but is also technically, content-wise, and strategically prepared for your use case.